Vectorized (AI Vectorizer) - Image Tracer Plugin Interface - showing settings panel and preview

Your First Vectorization in 5 Minutes

Follow this guide to convert your first bitmap image into a beautiful, editable SVG vector. No prior experience needed!
Before you begin, make sure you have:
  • ✓ Vectorized (AI Vectorizer) - Image Tracer installed (installation guide)
  • ✓ At least 10 credits in your account (buy credits)
  • ✓ A bitmap image (PNG or JPG) in your Figma file to vectorize
Don’t have an image? Use any screenshot or photo already in your Figma file to follow along.

Step 1: Select Your Image

1

Choose a Raster Image

Click on any bitmap/raster image in your Figma canvas. The plugin works with:
  • 🖼️ Imported PNG/JPG files
  • 📋 Pasted screenshots
  • 🎨 Nodes with image fills
  • 📷 Drag-and-dropped photos
What kind of images work best?
  • Logos and icons - Clean, simple shapes
  • Flat illustrations - Limited colors, no gradients
  • Line drawings - Sketches and outlines
  • ⚠️ Photos - Work, but may need High-Fidelity preset
  • Text - Better to use Figma text layers directly
2

Verify Selection

Once you’ve selected an image, the plugin automatically detects it. You’ll see:
✓ Image preview appears in the plugin’s canvas area (center-right)
✓ “HD Preview” button becomes active (changes from disabled to blue)
✓ “Convert to SVG” button is enabled at the bottom
✓ Settings panel remains available on the left
Not seeing the image preview?Common issues and fixes:
  • No image fill: Make sure the selected node actually contains an image (not just a solid color fill)
  • Image not loaded: Wait for the image to fully load in Figma first
  • Wrong format: Plugin works with PNG/JPG only (not SVG, PDF, or video)
  • Locked/Hidden layer: Unlock and make visible
Still not working? Try:
  1. Right-click the image → Copy
  2. Create a new rectangle (R key)
  3. Paste the image as fill (Cmd/Ctrl + V)
  4. Select the rectangle
3

Optional: Prepare Your Image

For best results, consider these quick optimizations:
If your image has a background you don’t need, remove it before vectorizing:
  • Use Figma’s background removal tool
  • Or use a service like remove.bg
  • Clean backgrounds produce cleaner vectors
For sketches and line art:
  • Adjust brightness/contrast in Figma
  • Makes lines more defined
  • Results in cleaner vector paths
Remove unnecessary space:
  • Frame the main subject tightly
  • Reduces processing time
  • Focuses vectorization on what matters
These optimizations are optional! The plugin works great with raw images too. Feel free to skip if you’re just testing.

Step 2: Choose a Preset

Presets are optimized configurations for different image types. Pick the one that matches your image:

🎯 Decision Helper

Still not sure which preset to choose?
  • Simple graphics (logos, icons) → Logo
  • Don’t know / General useIllustration
  • Lines only (sketches) → Line Art
  • Very complex / detailed → Try Illustration first, then High-Fidelity if needed
Pro tip: Use HD Preview (only 2 credits) to test different presets!

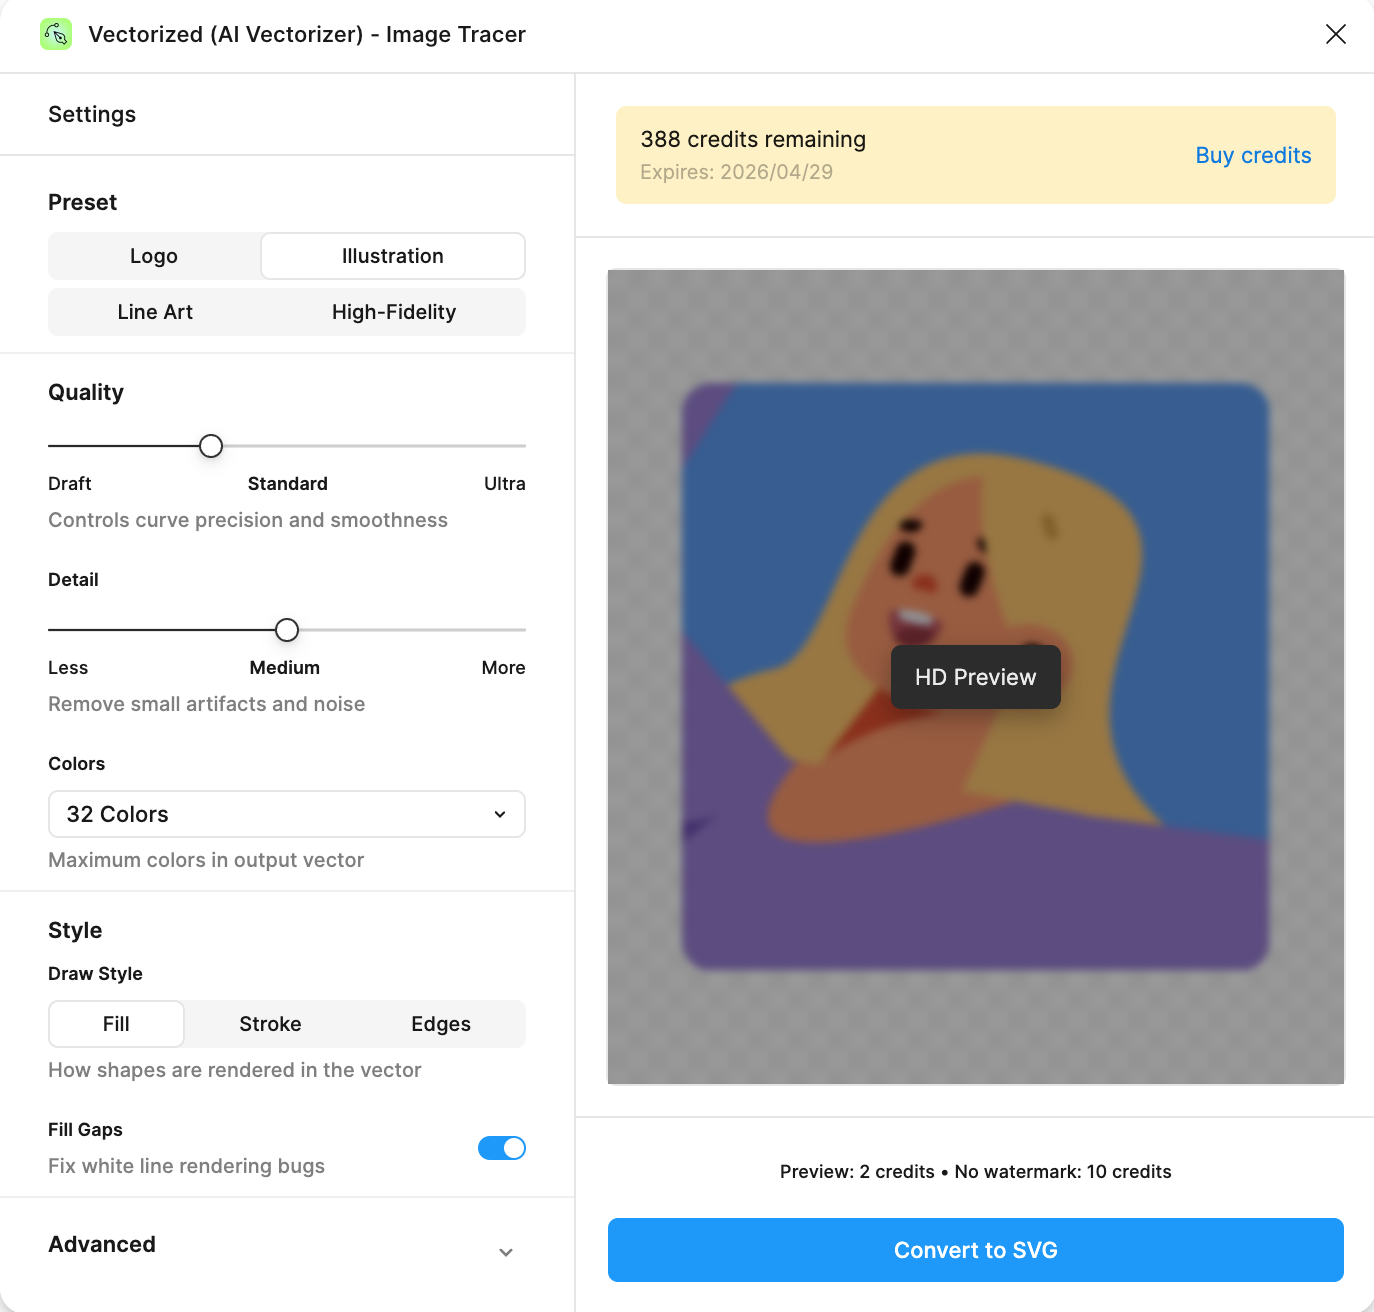
Before spending 10 credits on the final conversion, use HD Preview to test your settings.
1

Click 'HD Preview' Button

Cost: 2 credits (5x cheaper than full conversion!)What you get:
  • Full-resolution preview with watermark
  • Zoom and pan controls
  • Side-by-side comparison
  • Verify settings before committing
Click the blue “HD Preview” button to start processing.
2

Wait for Processing

Processing typically takes:
  • Simple images: 3-8 seconds
  • Medium complexity: 8-15 seconds
  • Complex images: 15-30 seconds
  • High-Fidelity preset: 30-60 seconds
You’ll see a loading indicator with the message “Generating preview…”
3

Review the Preview

Once complete, a modal window opens showing your vectorized preview:Preview features:
  • 🔍 Zoom controls: Inspect details at 400% zoom
  • 👆 Pan: Click and drag to move around
  • 🖼️ Comparison slider: See before/after side-by-side
  • Convert button: Go straight to full conversion if satisfied
Look for:
  • Are curves smooth and clean?
  • Any jagged/stair-step edges?
  • Sharp corners preserved?
If not good:
  • Increase Quality to High or Ultra
  • Lower Detail if too many small shapes
4

Adjust Settings (If Needed)

If the preview isn’t perfect, close the modal and tweak your settings:
Solution: Increase Quality
  1. Move Quality slider to High or Ultra
  2. Click HD Preview again (2 credits)
  3. Compare results
Why it works: Higher quality = smoother, more precise curves
Solution: Decrease Detail
  1. Move Detail slider LEFT (toward “Less”)
  2. Try Detail value of 30-40
  3. Preview again
Why it works: Lower detail removes small shapes (noise, JPG artifacts)
Solution: Increase Colors
  1. Change Colors from dropdown (try 64 or 256)
  2. Preview again
  3. Or try Unlimited for maximum color accuracy
Why it works: More colors = more accurate color representation
Solution: Increase Detail or switch Preset
  1. Move Detail slider RIGHT (toward “More”)
  2. Try Detail value of 70-80
  3. Or switch to High-Fidelity preset
Why it works: Higher detail preserves smaller shapes and features
Solution: Change Draw Style or Preset
  1. Go to Style section in settings
  2. Change Draw Style to:
    • Fill for solid shapes (default)
    • Stroke for line outlines
    • Edges for edge outlines only
  3. Or switch to Line Art preset for stroke-based output
Why it works: Different draw styles create different vector types
Preview is cheap! Each preview only costs 2 credits vs 10 for full conversion. Don’t be afraid to preview multiple times with different settings until you’re happy!
5

Skip Preview (Optional)

If you’re confident with your preset choice, you can skip HD Preview and go straight to conversion.When to skip:
  • You’re familiar with the presets
  • Simple image with predictable results
  • You’re okay with potential re-conversion
When NOT to skip:
  • First time using a preset
  • Complex or important image
  • Unsure about settings
  • Want to save credits (preview first = avoid re-conversion)
Pro users skip preview for routine conversions, but new users should always preview first to learn how settings affect results!

Step 4: Convert to SVG

Once you’re happy with the preview (or if you skipped preview), it’s time for the final conversion!
1

Click 'Convert to SVG'

Cost: 10 credits (no watermark)What happens:
  • Image is processed with your chosen settings
  • High-quality SVG is generated
  • Result automatically placed in Figma
  • Your credit balance updates
Click the green “Convert to SVG” button at the bottom of the plugin.
Don’t have 10 credits?The plugin will automatically generate a watermarked preview for free. You can still see the result, but you’ll need credits to get the clean, usable SVG.Purchase credits now →
2

Wait for Processing

Processing time varies by image complexity:
Image TypeExpected Time
Simple logo5-10 seconds
Illustration10-20 seconds
Line art15-25 seconds
High-Fidelity30-60 seconds
The button shows “Converting…” and you’ll see a progress indicator.
Taking longer than 2 minutes?
  • Check your internet connection
  • Try reducing Quality or Detail settings
  • Complex images with High-Fidelity can take up to 90 seconds
  • If it fails, you’ll see an error message and credits will be refunded
3

SVG Automatically Added to Figma

When conversion completes, several things happen automatically:
✅ SVG is placed next to your original image on the canvas
✅ New SVG is automatically selected (ready to move/edit)
✅ Success notification appears: ”✓ SVG converted successfully!”
✅ Your credit balance updates in the plugin
✅ Viewport scrolls to show both original and result
Pro tip: The original image stays untouched. Compare them side-by-side, then delete the original once you’re satisfied!

Step 5: Edit Your Vector in Figma

Your SVG is now a fully editable Figma vector! Here’s what you can do:
Make it match your design system
1

Select the SVG group

Click on the vectorized SVG in your canvas
2

Enter the group

Double-click or press Enter to enter the group
3

Select individual shapes

Click on any shape inside the SVG
4

Change fill color

  • Use the Fill picker in the right panel
  • Or use your brand color styles
  • Colors update instantly!
Select all shapes of one color:
  1. Enter the SVG group
  2. Click one shape with the color you want to change
  3. Cmd/Ctrl + Click other shapes with same color
  4. Change fill once for all selected
Or use Find/Replace color (Figma plugin) for bulk changes!

Congratulations! 🎉

You’ve successfully converted your first bitmap to vector! Your design is now:

✓ Infinitely ScalableNo quality loss at any size

✓ Fully EditableModify colors, shapes, and paths

✓ Lightweight5-10x smaller than PNG

✓ Production ReadyUse in designs, web, print

What’s Next?

Now that you know the basics, level up your vectorization skills:

Common First-Time Issues

Checklist:
  • ☐ Did you select a node with an image fill? (not text or shapes)
  • ☐ Is the image fully loaded in Figma?
  • ☐ Is it a PNG or JPG format? (not SVG, PDF, or video)
  • ☐ Is the layer visible and unlocked?
Solutions:
  1. Try right-clicking the image → Plugins → Vectorized (AI Vectorizer) - Image Tracer
  2. Copy image, paste as fill on a rectangle, select rectangle
  3. Refresh the plugin (Cmd/Ctrl + R in Figma)
  4. Check troubleshooting guide for more help
Possible causes:HD Preview disabled:
  • Not enough credits (need 2)
  • No image selected
  • Plugin connection issue
Convert to SVG disabled:
  • Not enough credits (need 10)
  • No image selected
  • Processing in progress
Solutions:
  1. Buy credits if balance is 0
  2. Make sure image is selected (see preview in plugin)
  3. Check internet connection
  4. Restart plugin if stuck
Common causes and fixes:
ProblemLikely CauseSolution
Jagged edgesQuality too lowIncrease Quality to High/Ultra
Too many dotsDetail too highDecrease Detail to 30-40
Wrong colorsColors setting too lowIncrease Colors to 64/256
Lost detailsDetail too lowIncrease Detail to 70-80
Wrong styleWrong presetTry different preset or change Draw Style
Best practice: Use HD Preview (2 credits) to test before full conversion!
Expected times:
  • Simple images: 5-15 seconds
  • Medium complexity: 15-30 seconds
  • High-Fidelity preset: 30-90 seconds
If longer than 2 minutes:
  1. Check internet connection
  2. Try refreshing Figma
  3. Reduce image complexity:
    • Lower Quality to Standard
    • Decrease Detail
    • Use smaller original image
  4. Avoid High-Fidelity preset for testing
Still stuck? Contact support with details about your image size and settings.
This shouldn’t happen! But if it does:
  1. Check canvas: SVG might be placed far from viewport
    • Press Shift + 1 to zoom to see all
    • Look for new layer in layers panel
  2. Check Figma notifications: Error message may appear
  3. Wait 60 seconds: Network delay possible
  4. If truly lost: Contact support immediately
    • Include timestamp
    • Screenshot of credit balance
    • We’ll refund lost credits
Note: If conversion fails due to error, credits are automatically refunded within 1 minute.
Small differences are normal due to:
  • Preview is PNG representation
  • Final SVG has precise vector math
  • Figma rendering vs web rendering
If drastically different:
  1. Check if you changed settings after preview
  2. Make sure you clicked Convert (not Preview again)
  3. Try converting again with same settings
  4. Contact support if consistently different
Tip: Previews are 95%+ accurate. Minor differences in fine details are expected.

Still Need Help?

Check our comprehensive FAQ and troubleshooting guide →
Feedback welcome! Did this guide help you? Have suggestions? Email us at zouwenqiang678@gmail.com